Saturday, December 31, 2016

Wings Of War: Bombing with Autopilot

This was basically a simple scenario where a British Airco DH.4 light bomber escorted by a Sopwith Camel scout would bomb a German infantry reserve camp protected by two Fokker D.VII scouts.

The British entered in the centre of their short board edge. The camp was placed one foot in from the centre of the German short board edge and the German scouts each rolled to determine if they entered at the right corner, centre or left corner of their short board edge.

We use the Wing Of War WW1 (now Wings Of Glory) rules.

The scenario was made interesting, when we chose to fly one D.VII each and let the British fly on the "autopilot" rules written by Herkybird. These rules are simple to use and surprisingly effective although they lack some features such as tailing which we added.

To determine what the "autopilot" plane does, use a combination of
a) the direction of the nearest threat (using the clock shown)
b) the distance to the nearest threat
c) the attitude of the nearest threat
d) a D6 die roll

For bombers even the direction and distance to the target is important.

Unfortunately there were no rules for tailing, so we added our own.
The DH.4 never made it to the target, it was shot down before it could get there.
We replaced the original target card with a camp of tents using Irregular Miniatures' 2mm models.

The result was a near run thing, which surprised us. The autopilot DH.4 was shot down, but it did so much damage to one D.VII that it limped off the table with one damage point remaining. The other D.VII and the autopilot Camel fought a duel which was just won by the D.VII. Fun rules, we will try them again.

Saturday, November 12, 2016

Battle of Ocaña in 6mm

Refight of the Battle of Ocaña, 19th November 1809, using Commands & Colors Napoleonic Rules. Figures from Baccus 6mm range, hex terrain from Kallistra, houses from TBM and trees from Timecast.

I had just read “The Battle Of Ocaña – the Army of Spain’s Greatest Victory” by Pierre Juhel so I was inspired to refight the battle.


Background:

The Spanish campaign of fall 1809 was unfolding successfully. The subsidiary Army of the Left had beaten the French at Tamames. Now the 55,000 man Army of La Mancha commanded by Juan de Aréizaga was a mere 35 miles from Madrid. The French were reacting quickly and soon assembled over 30,000 troops, with more approaching to cut off the Spaniards. Aréizaga realized the threat and began to fall back, but not quickly enough. The French army, under the tactical command of Marshal Soult, brought the Spanish army to bay near the village of Ocaña where it deployed in terrain unfavorable for the defense. The Spanish center and right were formed on an open plain – excellent terrain for the French cavalry. On the 19th Soult ordered Sebastiani to attack the Spanish right flank infantry with his German and Polish divisions. When the infantry was fully engaged, Milhaud’s French cavalry attacked Freire’s cavalry, severely battered in the previous day’s cavalry battle, and quickly routed the Spanish horse. Meanwhile the Spanish were funneling reinforcements to the right and began to press back Sebastiani’s troops. The Spanish advantage was only temporary. Soon the victorious French cavalry, including the feared diablos Polacos (the Polish Vistula Legion lancers), fell upon the rear of the Spanish right flank infantry. In minutes three Spanish divisions ceased to exist.

Marshal Soult advanced infantry on the newly exposed Spanish center divisions, pinning them in place. Soon the French cavalry descended on these troops too, scattering them to the wind. Dessolles’ division then stormed Ocaña, and all remaining Spanish formations fled except for Zayas’ division. It attempted to cover the Spanish retreat, and retained its formation for several miles, but it too collapsed later in the day to a French cavalry pursuit that could not be stopped. Over 5,000 Spaniards were casualties and another 14,000 were captured, along with virtually all of the army’s artillery.
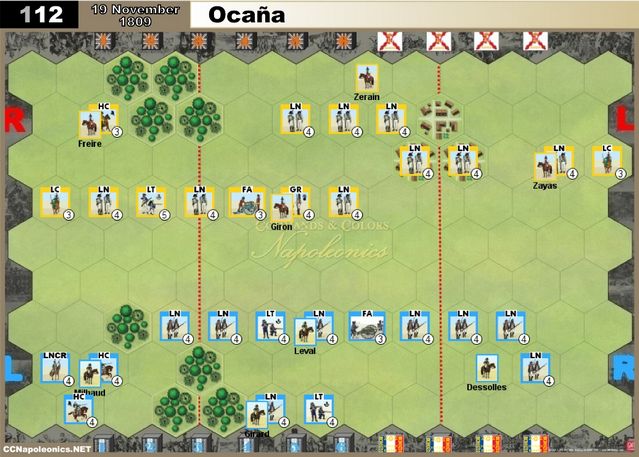
The Setup:

The armies deployed on what was basically an open plain in front of the village of Ocaña,

View from the French left


View from the French right


The Game Layout


The village of Ocaña, heavily defended by Spanish infantry. Houses are TBM and the statue is a Baccus SYW general.


The Battle:

The battle commenced with an artillery bombardment from both side, in the hope of softening up their opponent. This was more successful for the Spanish than the French; a cannon ball decapitated le général Jean François Leval early in the battle.

Spanish artillery

French artillery

Realizing that they were getting the worst of the bombardment, the French commander ordered an attack by his left flank, led by the feared Polish Vistula Lancers.

The Polish Vistula Lancers, supported by général Édouard Jean-Baptiste Milhaud and his dragoons, charge and totally defeat the Spanish Húsares de Extremadura.

Following in the wake of the fleeing hussars, the Lancers encounter Spanish Heavy Cavalry which they also totally defeat.

Seeing that the Lancers were so successful, Milhaud charged his dragoons at the nearest Spanish infantry, who just in time managed to form square and repulse the dragoons. Fortunately for Milhaud, his supporting infantry arrived just in time with a bayonet charge at the Spanish square which stood no chance and was defeated totally.

Returning from defeating the Spanish Cavalry, the Vistula Lancers attack the Spanish light infantry in the rear, the remnants of which retreated hastily into the nearby woods to save themselves from the lances. 

The Spanish tried to distract the French by a counter-attack in the centre, but the French infantry fought this off. At the same time the French left continued to roll up the Spanish troops. Milhaud's dragoons, supported by fresh French infantry, charged the Spanish infantry which failed to form square in time and was annihilated. Simultaneously the Vistula Lancers charged the Spanish artillery which had been damaging the French centre. 

Having defeated the Spanish artillery, the Vistula Lancers continued their charge, swerving to miss the steady Spanish infantry, they attacked the Granaderos a Caballo de Fernando VII. The Spanish cavalry had not been having a good day, and this was to be no different, they were defeated and the remnants fled the field. 

Having seen their right wing and centre being rolled up by the French cavalry, the remains of the Spanish army lost heart, and withdrew from the battlefield. The French had been lucky, two Cavalry Charges and a Bayonet Charge by the supporting infantry had decimated the Spanish.


Tuesday, October 25, 2016

Red Dragon

Just finished painting a 6mm dragon from Perfect Six Miniatures. It comes from their Order of the Dragon fantasy range and should have been the Black Dragon Ashmar. But I chose to paint it red. He, or perhaps she, (I'm unsure how to tell the sex of a dragon) works just as well in a dungeon crawl as a 28mm baby dragon.

A "6mm" dragon.

The party looking surprised at meeting a "28mm" baby dragon.

Are baby red dragons very hungry?


Friday, October 21, 2016

Wings Of War: Multi-player Dawn Patrol

I designed a new scenario for Wednesday game night: a multi-player Dawn Patrol scenario for Wings of War that will accommodate 3-6 players.

The Hun hiding in the clouds

Mission
Conduct a patrol of this sector of the front. Engage and destroy all enemy aeroplanes.

Gaming Area
The gaming area should be 90cm wide x 135cm deep. If using the WoW playing mats, this will give you 6 map edges. Allied patrols are over enemy territory and German patrols are over their own front line (no man’s land).

Forces
Each player has one scout. Alternatively for a longer game, each player has two scouts. Divide the players into two equal teams: Allies and Central Powers. If one team has fewer players, balance the game by giving them the most experienced players, or better aeroplanes or Ace skills or higher altitude.

Setup

  1. Place two irregular-shaped clouds randomly on the playing area. 
  2. Each player determines randomly from which edge they enter. No two players can enter from the same edge.
  3. Randomly determine one player whose scout enters the playing area.
  4. Place the entering scout in the middle of the map edge. If using two scouts, place the first scout slightly in the lead and the second scout off the leader’s right wing and slightly behind. If using the optional altitude rule, all scouts enter with 3 pegs (altitude 2).
  5. When entering, the first card planned must be a normal straight-ahead manoeuvre.card. The other players on the playing area manoeuvre as normal.
  6. Repeat 3 to 5 each turn until all players have entered.

Game Length
The game ends when one side no longer has any aeroplanes remaining in the gaming area.

Clouds
LOS is blocked firing into, out of or through a cloud. All firing must have a LOS to the target. Clouds do not move during the game, their speed relative to that of the aeroplanes being negligible.

Victory Conditions
Shoot down or drive off all enemy aeroplanes.

Head-on encounter

Close Range

Being tailed!


Wednesday, October 19, 2016

Waterloo: the Fight for Hougoumont - Part 2, The Battle

Previous post: Part 1, The Setup

Let battle commence...

The two sides are drawn up ready for battle

The French advanced with their right flank and opened fire with their artillery on the Nassau light infantry in the woods causing them to retire.

The French light infantry take casualties covering the advance of the columns of line infantry.

The Nassau infantry in the woods, moves over to stop the advance, the Nassau light infantry retreated into the safety of the orchard and Wellington orders forward troops from the ridge to secure the orchard.

The French attack the Nassau infantry so as to clear the wood, while at the same time coming under heavy fire from the British infantry guarding the orchard.
The French take the woods causing the Nassau infantry to rout, but not without heavy losses from defending infantry fire. The Allies have occupied a good defensive position and caused serious casualties, so the advance on the French right flank grinds to a halt.


The French switch their attention to the Left Flank and start by advancing with their Light Infantry to drive the Hanoverian Jaegers out of the woods.

Columns of Line Infantry advance around the flanks of the woods to support the light infantry and approach Hougoumont itself.

Both the Jaegers and the supporting horse artillery take heavy losses but cling valiantly to the woods.

The French charge the horse artillery battery which inflicts heavy losses with canister before being captured.

The way was now clear to attack the Chateau, so the French columns charged, only to be blown away by the accurate fire of the British Guards defending Hougoumont supported by the remaining few Hanoverian Jaeger and flank fire from the infantry in the walled garden.
The Allies had now occupied a strong defensive position around Hougoumont, and the French were so weakened that the could no longer break into the Chateau. 

The Result: 
Wellington's troops still held Hougoumont with a strong force of Scots Guards in the Chateau itself. The French attack was stopped and had to be content with holding the woods, from which they could skirmish with the defenders. The French generals watched the massed heavy cavalry charges off to their right, in the sure knowledge that if the cavalry couldn't break the Allied squares, then the Old Guard would surely crush all resistance before it!

Sunday, October 9, 2016

Waterloo: the Fight for Hougoumont - Part 1, The Setup

The fight for Hougoumont using Command & Colors Napoleonic Rules.

Hougoumont from Irregular Miniatures 6mm scenics range, figures from Baccus 6mm, hex terrain from Kallistra and trees by Timecast.

Details of the scenario can be found here.

At Waterloo, Wellington had little choice but to occupy Hougoumont, for it would prevent the French from gaining the heart of the British position along the ridgeline. In fact, Wellington came close to losing the battle by undergarrisoning Hougoumont.

Opposite Hougoumont stood General Foy and Jerome Bonaparte with three divisions of the French II Corps. The initial attack began around 11:30 AM. The first assault met resistance, but the French infantry forced their way into the woods. As they came out on the other side, they were forced to fall back from the intense fire from the buildings and walled garden. The second assault gained a small lodgement, but the attackers again were driven back. A third attack breached the gate of the walled farm, and only the heroics of local Guards commander MacDonell and a small force succeeded in closing the gate and wiping out the attackers. Despite the success of the defenders, the crisis was not over yet, for Foy’s Division joined the attack around 1 PM and gained the orchard. The Scots Guards then counter attacked from the ridge and drove the French out of the orchard. The orchard was attacked again in the late afternoon, but the British had reinforced the position and the attack again failed. The battle for Hougoumont was all but over by 7 PM.

The Battlefield from the French side
The Game Layout

The French Left
The French Right
Hougoumont Awaits

Defending the Walled Garden

The Allied Left

The Allied Right
The French wait for the order to advance

Overview of the whole battlefiend

Next Post: Part 2, The Battle


Sunday, September 11, 2016

Battle of Quatre Bras in 6mm - Part 2, The Battle

Previous post: Part 1, The Setup

The battle started with a French bombardment. This caused the Allies to retire behind a fold in the ground.


The French then launched a succession of piecemeal attacks on the Allied lines, but none with enough strength to break through.


The Brunswick artillery repulsed the first infantry attack.


The Duke of Brunswick was in the thick of things, but unhistrionically survived to fight again at Waterloo.


Reinforcements: The Guards arrive! At about the same time, Wellington turned up and helped rally many inexperienced recruits back to the colours!


The Allies built a strong defensive line in front of Quatre Bras. Kellermann's Cuirassiers couldn't break through and got devastated by the firepower of the British infantry. Even the poor Brunswick infantry held!


And the French didn't have enough reserves to push any more. D'Erlon never turned up! The Allies held the crossroads.